Loading... Please wait...
Categories
Popular Brands
Exposure and Dark Room Help
Exposure and Dark Room Help
It is no mystery that properly coating and exposing a screen is the most tedious and frustrating part of screen printing. There are many factors that come into play that make it tricky to perfect, and everyone's exposure times and set ups will be different because of this. We want to help make this learning process as easy as possible so that everyone can enjoy screen printing.

(PRINT THIS USING AccuRIP FOR BEST RESULTS)
How to use an exposure calculator:
- Start by deciding how many second intervals you want to do. (We suggest doing about 20 seconds
- Tape your exposure calculator to a coated screen and place it on your exposure unit
- Block all but the 10th section of the calculator with card stock, or thick paper (Must completely block out light)
- After you've gone 20 seconds on the 10th section (if that's how long your intervals are) slide the card down to expose the 9th section. This will expose the 10th section for another 20 seconds as well
- Continue this process until you have done an interval of time for all 10 sections (by time you're done, if you did 20 second intervals, the 10th section would have been exposed for a total of 200 seconds (3 minutes and 20 seconds)
- Once you're done exposing the screen, go ahead and wash it out
- Which ever section came out the best will tell you how long you should be exposing that particular emulsion on that particular exposure unit
- Example: if section 8 was the best exposure and you did 20 second intervals you would multiply, 8x20=160, 160 seconds is 2 minutes and 40 seconds, thus your exposure time for your current set up will be 2 minutes and 40 seconds
INTERVAL SUGGESTIONS:
500w Halogen Light = 1 minute intervals
Florescent Tube Exposure Units = 20 - 30 seconds
Single Point Exposure Units (Metal Halide) = 10 - 20 seconds
How to do an exposure test:
This method will help someone who doesn't have access to an exposure calculator figure out how long to burn their screens for simple designs. Using an exposure calculator is ideal for figuring our how long to burn high detail and half tones, but this will work for most applications.
How to prevent dots in your emulsion:
If you're new to coating screens its almost inevitable that you have experienced dots in your emulsion that are a pain to wash off and make screen cleaning more time consuming. This is a little trick we figured out for preventing that.
Storing screens in a dry environment:
Emulsion is made up mostly of water, so when screens are coated they need to be stored in a dry climate or they won't dry correctly so that they can be exposed. It is important to run a dehumidifier in your dark room to prevent any issues regarding moisture in the air.
Post exposing screens:
Post exposing screens is a very simple, yet very beneficial step of the exposure process. If there were any inconsistencies in your exposing process (any under exposed emulsion that didn't wash out on you wile washing out the design) this process will insure that those spots are nice and hard. It will also insure overall longevity of designs on your screens.
Setting up multi-color designs for exposure:
Exposing multi-color designs can be tricky at times. It is important that they are placed on the screen in a very similar manor so that when you get your screens onto a press you don't exceed the limits of your registration adjustments trying to line up the print. If the design isn't lined up right you'll have to redo the process from the beginning!
Follow us on
Featured Product


newsletter
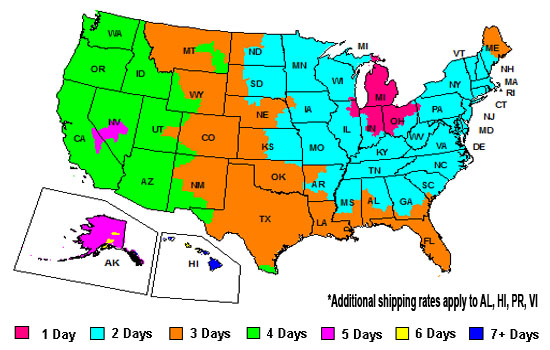
Shipping Times Map